
It’s easy enough to get an app working on localhost but many devs don’t have experience porting an app to production. I’ve done just about every piece of this at one time or another but I thought that I would put them altogether in a single guide for future reference. I could have taken the easier route by doing this right in Firebase or AWS but I wanted to do this piece by piece so I had a better understanding of all of the components. I have a reseller account with A2 Hosting (side note: if you ever sign up with them please use this link so I get credit!) so I thought it would be interesting to try to get this to work in CPanel. I’ve done some reading on this and it seems that if everything works I should be able to push to production directly from github and that sounds very cool. Unfortunately the A2 CPanel account only offers AngularJS out of the box but their support team assured me that I can install NPM and once I do that I can set things up myself.
The following guide assumes that you have an existing project in git and that you know how to push/pull from your dev area (e.g. we are cloning an existing project in CPanel and not creating a new one).
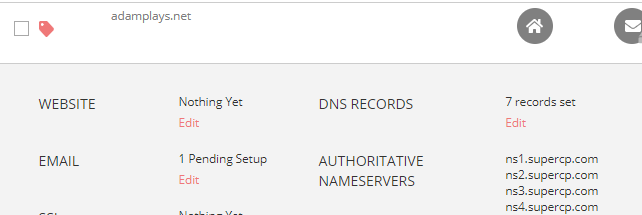
Step 1. Get your Domain name
Ok, I said this was going to be comprehensive. I use Porkbun as my registrar as they are really cheap. Once you have your name reserved you will need to edit the “Authoritative Nameservers” area of your registration to point to the nameserver of your host. In an hour or two the DNS should be set up and you can create your CPanel account. In my experience it is best to wait a bit because if you create your host account too early they will use a temporary name and then you’re going to have some cleanup to do later.
Step 2. Create your CPanel Account
This is obviously going to vary from host to host. In A2 I actually have to create a new customer under my reseller account.
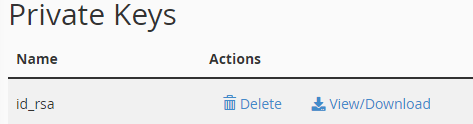
Step 3. Create Your Private SSH Keys
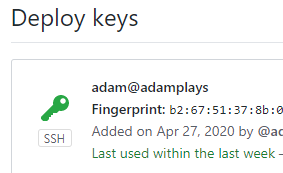
Things get a little dicey here. Assuming that your repository is private you will need to set up an SSH key in cpanel and then enter that information into github. I found this guide to be fairly helpful, although I could not get the cat command to return the ssh key. Instead I went into the “SSH Keys” are in cpanel and the key I had created was detected automatically. I had to only authorize it and then click “View” to see the key. Once I did that I hopped back over to the guide to put the Private key into github settings.
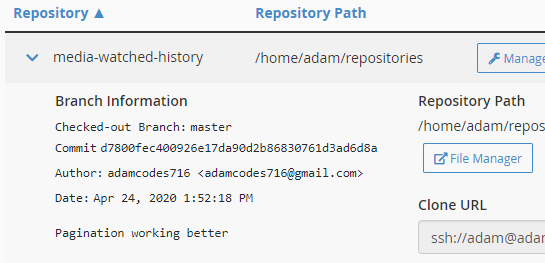
Step 4. Clone Your Repository
Assuming the previous steps were correct you should be able to clone your repository. Please note that you can’t use the git url listed in your projbect. Instead, use a command similar to this:

Note that if you receive this error:
error: “/usr/local/cpanel/3rdparty/bin/git” reported error code “128” when it ended: fatal: could not read username for ‘https://github.com’: no such device or address
You messed up the URL. Note that the user must be “git@github.com”.
You can also accomplish this using the Terminal but if you do so the project will not show in the Git UI.

Note that you can pull and deploy from “Manage”. In this guide we will continue on to deploy directly from your local pc.
You will also note that git detected the access by CPanel.
Step 5. Set up Yaml File
CPanel needs instructions on what to do during deployment. We use a file called .cpanel.yml file to accomplish this. This file needs to be checked in to the top level of your expository. Be sure that the path matches what you see in “File Manager”.
---
deployment:
  tasks:
    - export DEPLOYPATH=/home/adam/public_html/
    - /bin/cp index.html $DEPLOYPATH
    - /bin/cp style.css $DEPLOYPATH    - /bin/cp style.css $DEPLOYPATH
Step 6. Set Up Your Local Git Client
Your client will need to know how to push to the prod server. First, get the “Clone URL” from CPanel Git.
Once you do that you can issue this command from your local command line:
git remote add cpanel https://<Clone URL from previous screen cap>The remote is now tied to “cpanel”.
you can now push directly to cpanel: git push cpanel.
If you have the error “Bad config value for ‘receive.denycurrentbranch’ in config” see this article.
4/26/2020 – I am still receiving this error and am investigating it with A2.
Step 7. Set up NPM
This is needed if you want to do a local build on the server. It isn’t necessary – if you want you can simply move everything from your “dist” folder to your public_html file on the server via ftp.
To install npm follow this guide. Note that the version of node in the guide is outdated so you will need to go out into their dist/latest folder to find the current version. Substitute that version in both the download and installation steps.
Step 8 : To be Continued
I have run into a problem with the automated push from git and I’ve decided to leave this for a bit so I can continue making apps. I’ll pick it up again on some rainy day. For now, I am simply using ftp to promote the files to production.


[…] I have a working model of what I wanted to retrieve from the various api’s provided by trakt. There is one last problem that I am trying to deal with: trakt no longer serves image URLs. To get around this I am making a second api call to IMDB’s api to retrieve the image. This is proving to be a little more difficult than I planned, partly because the IMDB return is of type jsonp (not to mention the nested observable). I was making good progress doing this but I thought that now that I have a working app (albeit not complete) that I would take a break and get production set up. […]